How To Feed Sourdough Starter: Simple Steps For A Happy, Active Culture
Caring for a sourdough starter might seem like a big task at first, but it's honestly quite simple once you get the hang of it. Many home bakers, like you, want to make delicious bread, and a lively starter is the first step. You might be wondering, "how to feed sourdough starter?" and it's a very common question, too.
Whether you've grown your own starter from scratch, received one as a thoughtful gift, or even purchased one, you'll need to keep it fed. This process keeps the tiny, helpful microbes in your starter happy and ready to work their magic in your baking projects. It's really not as complicated as some online discussions might make it seem, you know?
So, let's get into how easy it is to maintain and feed a sourdough starter, without all the fuss. We'll cover everything from choosing the right flour to figuring out the best feeding schedule for your baking habits. This post may contain affiliate links, which means I make a small commission at no extra cost to you, by the way.
- How Much Do Tommy The Clown Dancers Get Paid
- What Is Ddot Real Name
- Template How We See Each Other
- Donkey Fall
- Why Did Bunnie Fire Hallie
Table of Contents
- Understanding Your Sourdough Starter
- The 3 Easy Steps to Feed Your Sourdough Starter
- Mastering Ratios for a Consistently Active Starter
- Choosing the Best Ingredients
- Sourdough Starter Feeding Schedules
- Common Mistakes to Avoid
- FAQs About Feeding Sourdough Starter
- Keeping Your Sourdough Starter Alive (Without the Stress)
Understanding Your Sourdough Starter
A sourdough starter is, basically, a living mix of flour and water that catches wild yeasts and good bacteria from the air. These tiny organisms are what give sourdough bread its special taste and airy texture. So, when you think about how to feed sourdough starter, you're really just making sure these little helpers have plenty to eat, you know?
Why Feeding Matters
Feeding your starter is a bit like giving it a fresh meal to keep it energetic and strong. Without regular food, the yeasts and bacteria get hungry, and their activity slows down a lot. This means your starter won't be as bubbly or able to make your bread rise properly. It's pretty simple, really, just like any other living thing that needs its nourishment.
Recognizing a Hungry Starter
A happy, well-fed starter will be bubbly and active, often with a pleasant, slightly sour smell. When it's hungry, it might look a bit flat, and the bubbles will be much fewer, or even gone. It might also have a very strong, vinegary smell, which is a sign it's used up most of its food. You'll definitely want to give it some fresh flour and water when you see these signs, too.
- How Did Daryl Get The Scar On His Face
- Khamzat Chimaev Without Bear
- Breckie Hill Shower Leaks
- Nomi Mac Miller
- Nomi Leasure
The 3 Easy Steps to Feed Your Sourdough Starter
Learning how to feed and maintain a successful sourdough starter really comes down to just three easy steps. These steps are straightforward and, honestly, make the whole process much less daunting than you might think. We're talking about a very simple routine here, so.
Step 1: Discard or Use Some Starter
First off, you'll need to remove a good portion of your existing starter. This is often called "discarding," but you can totally use this discard in other recipes, like crackers or pancakes, which is a nice way to avoid waste. The reason for this step is to make sure your starter has enough fresh food without becoming too large to manage. If you're ready to bake, remove starter to bake with as soon as it's expanded and bubbly, then feed the remaining starter immediately. It's really important to keep a manageable amount, you see.
Typically, you'll want to leave just a small amount, maybe 1-2 tablespoons, of your old starter in the jar. This small amount acts as the "seed" for your new, freshly fed starter. It helps keep the culture strong and consistent. So, don't worry about throwing too much away; it's all part of keeping your starter vibrant, you know.
Step 2: Add Fresh Flour
Next, you'll add fresh flour to the remaining starter. The type of flour you choose can actually make a bit of a difference in how active your starter becomes. Many bakers prefer unbleached all-purpose flour or bread flour, but whole wheat or rye flour can give your starter a really big boost, too, because they contain more nutrients for the microbes. It's all about providing good food for your tiny friends, after all.
The amount of flour you add will depend on your desired feeding ratio, which we'll talk about more in a bit. Just make sure to measure it somewhat accurately for consistent results. This fresh flour is the main food source, so it's a very important part of the feeding process.
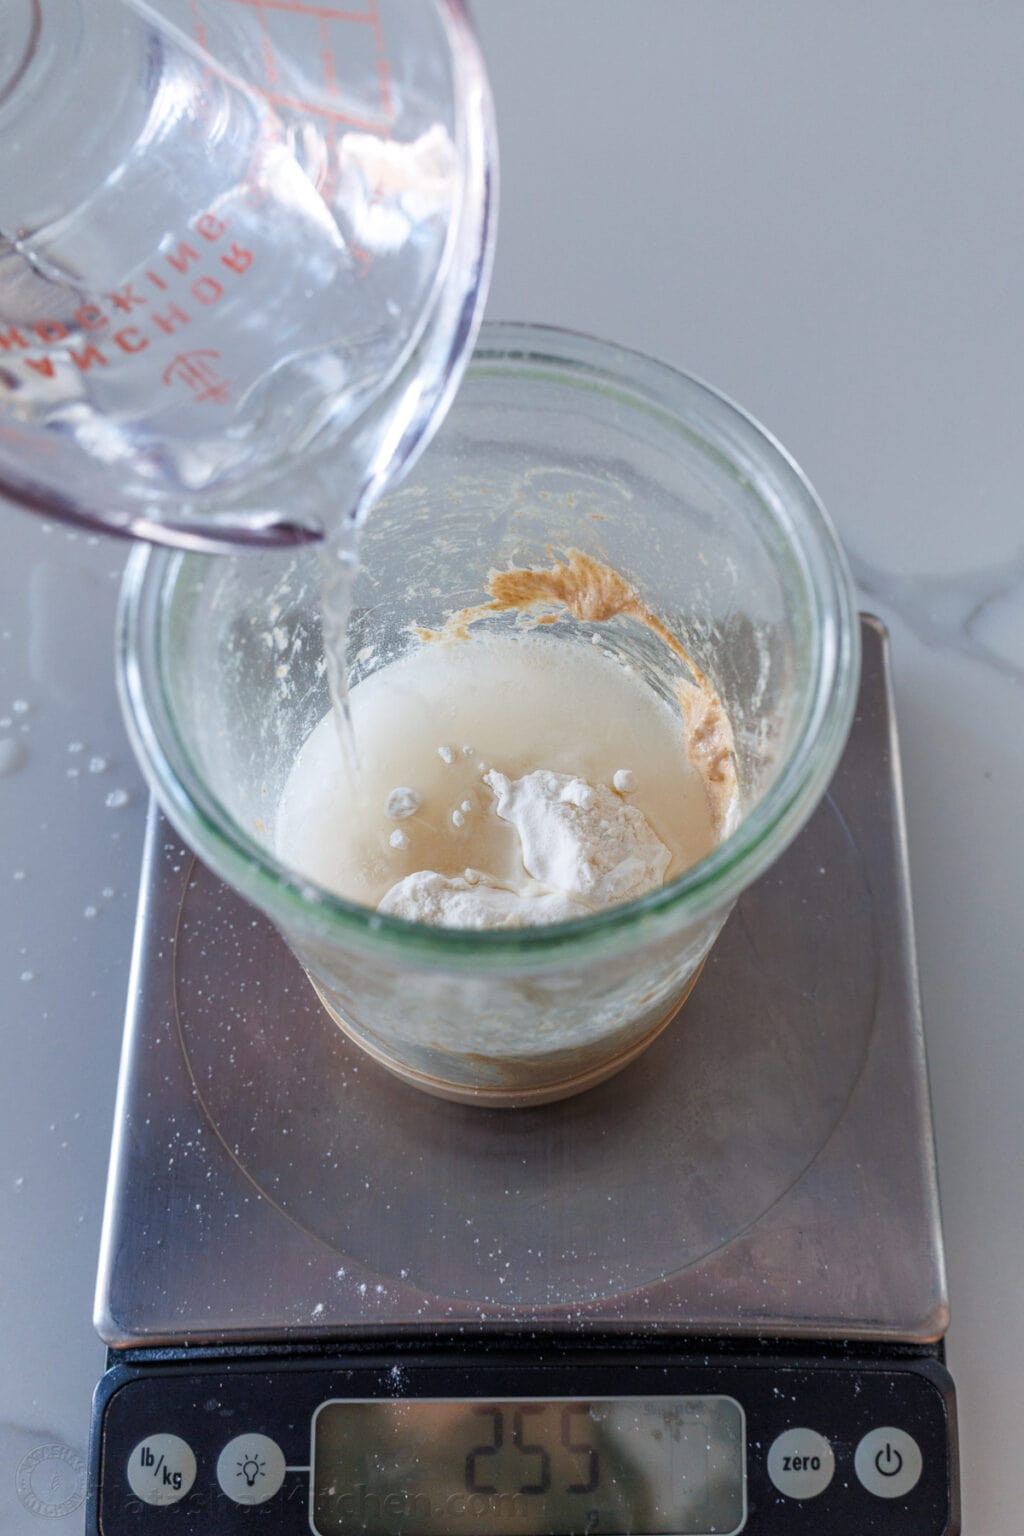
Step 3: Mix in Water
Finally, you'll add fresh, unchlorinated water to the flour and starter mixture. The water helps create the right consistency for your starter and allows the flour to be properly absorbed by the microbes. Tap water can be fine if it's not heavily chlorinated; otherwise, filtered or bottled water is a better choice. You want to make sure you're not harming the delicate organisms in your starter, you see.
Mix everything together thoroughly until there are no dry spots of flour left. The mixture should be somewhat thick, like a pancake batter, but not too stiff or too runny. This consistency, often called hydration, is pretty important for the starter's activity. A well-mixed starter will be happy and ready to grow, honestly.
Mastering Ratios for a Consistently Active Starter
When you're figuring out how to feed sourdough starter, understanding ratios is really key to a consistently active culture. It's about giving your starter the right amount of food for its size. This helps prevent it from getting too hungry too quickly or becoming too diluted, you know.
The Basic Ratio
A very common and easy-to-remember feeding ratio is 1:1:1. This means you use equal parts by weight of starter, flour, and water. So, if you keep 20 grams of old starter, you'd add 20 grams of fresh flour and 20 grams of water. This ratio tends to be a good starting point for most home bakers. It's quite forgiving, too.
Using this 1:1:1 ratio helps your starter reach its peak activity within a predictable timeframe, usually around 4-8 hours at room temperature. This consistency is super helpful when you're planning your baking schedule. It really takes a lot of the guesswork out of things, in a way.
Adjusting for Hydration
While 1:1:1 is a great general rule, you can adjust the water amount slightly to change your starter's hydration. A thicker starter (less water) might rise a bit slower, while a thinner one (more water) might be more active but also use up its food faster. Master ratios, timing and flour choices for a consistently active starter, that's what it's all about. This flexibility allows you to fine-tune your starter to your specific needs, you see.
Some bakers prefer a slightly higher hydration, perhaps 1:1:1.2 (meaning 1 part starter, 1 part flour, 1.2 parts water), for a more liquid starter. Others might go for a slightly drier one. The key is to find what works best for your environment and baking style. It's pretty much a personal preference, honestly.
Choosing the Best Ingredients
The quality of what you feed your starter matters quite a bit for its overall health and vigor. Just like with any recipe, good ingredients make a good outcome. Tips shared for choosing the best flour, the right jar, and how to keep it alive (without the stress), are really helpful here, too.
Flour Choices
For regular feedings, unbleached all-purpose flour or bread flour works wonderfully. These flours provide a steady food source for your starter. If you want to give your starter a real boost, perhaps after it's been in the fridge for a while, a bit of whole wheat or rye flour can be incredibly beneficial. These flours are rich in nutrients that the microbes just love, you know.
Avoid bleached flours, as the bleaching process can sometimes harm the delicate microbes in your starter. Stick to unbleached varieties for the best results. It's a small detail, but it makes a significant difference in the long run, really.
Water Quality
Chlorine in tap water can be harmful to your starter's beneficial bacteria and yeasts. If your tap water is heavily chlorinated, it's a good idea to use filtered water, bottled water, or even just let your tap water sit out in an open container for a few hours. This allows the chlorine to evaporate. It's a simple step that can prevent a lot of problems, you see.
Room temperature water is generally best, as very cold water can slow down your starter's activity. Warm water, on the other hand, can sometimes speed it up too much, causing it to peak and then get hungry too quickly. So, aim for something in the middle, pretty much.
The Right Jar
A clean glass jar with a loose-fitting lid is perfect for your sourdough starter. Glass allows you to easily see your starter's activity and cleanliness. A loose lid is important because your starter produces gases as it ferments, and these gases need a way to escape. A tight lid could cause pressure to build up. This simple choice helps keep your starter safe and happy, too.
Make sure your jar is clean before each feeding to prevent unwanted mold or bacteria from growing. A quick wash with soap and water, followed by a good rinse, is usually enough. You really want to keep a clean home for your starter, honestly.
Sourdough Starter Feeding Schedules
The frequency of feeding your sourdough starter depends mostly on how often you bake and where you store it. Feeding your starter once a day or once a week is a common practice, but the frequency can be adjusted based on your needs. It's not a rigid rule, you know.
Daily Feedings on the Counter
If you're baking often, or if your starter is quite new, daily feedings are recommended. As a general rule, if you have made a sourdough starter from scratch, it's best to keep your starter on the counter and feed it twice a day for 3 to 4 months. This consistent feeding keeps it very active and ready to use whenever you need it. It's like keeping a pet; it needs its regular meals, you see.
Daily feeding means your starter will be at its peak activity more often, which is ideal for baking bread that needs a strong rise. It also helps to build a very robust culture over time. So, if you're serious about your sourdough, this is the way to go, pretty much.
Weekly Feedings in the Fridge
For less frequent bakers, or if you want to take a break from daily feedings, storing your starter in the refrigerator is a fantastic option. The cold temperature slows down the fermentation process significantly, meaning your starter won't get hungry as quickly. Refrigerated sourdough starter is a valuable ingredient for baking delicious and nutritious bread, however, it requires proper care and feeding to ensure its longevity. You'll typically feed it once a week when it's stored this way, too.
When you take your starter out of the fridge to bake, give it a feeding and let it warm up to room temperature and become active again. This might take several hours, or even a couple of feedings, depending on how long it's been in the cold. It's a little bit of a reawakening process, you know.
Adjusting Frequency
The frequency can be adjusted based on a few guidelines. If your kitchen is very warm, your starter will ferment faster and might need more frequent feedings. In a cooler kitchen, it will slow down and might be fine with less frequent feeding. You really have to pay attention to your starter's behavior and your environment, you see.
Listen to your starter. If it's consistently rising and falling quickly, it might need more frequent feeding or a larger feeding. If it's sluggish, it might be hungry or need a warmer spot. It's a bit of a dance, honestly, but you'll get the rhythm down.
Common Mistakes to Avoid
Feeding your sourdough starter doesn’t have to be complicated, but there are a few common missteps that can make it seem that way. If you’ve ever fallen down the internet rabbit hole of hydration percentages, feeding schedules, and storage methods, you know how confusing it can get. Avoiding these mistakes will help keep your starter healthy and your baking stress-free, too.
Feeding Too Much or Too Little
One common mistake is feeding your starter with too much or too little food. If you feed it too much flour and water compared to the amount of old starter, you might dilute the culture, making it less active. Conversely, feeding too little means your starter will eat through its food too quickly and become hungry again before you're ready. Finding that sweet spot with the ratios is pretty important, you know.
Consistency in your feeding ratio is key. Once you find a ratio that works for you, try to stick with it. This helps your starter maintain a predictable rhythm, which is super helpful for planning your baking. It's like setting a schedule for it, basically.
Ignoring Your Starter's Signals
Your starter will tell you when it's happy and when it's hungry. Ignoring signs like a lack of bubbles, a strong acetone smell, or a watery consistency means you're missing important cues. These are all indicators that your starter needs attention. Paying close attention to these signals will help you adjust your feeding schedule or ratios as needed, you see.
A healthy starter should smell pleasant, like slightly sour yogurt or ripe fruit. It should also expand and get bubbly after feeding. If it's not doing these things, something is probably off, and it's worth investigating. It's a pretty clear communication, honestly.
Using the Wrong Ingredients
Using bleached flour or chlorinated water can really set your starter back. The chemicals in these can harm the beneficial microbes, making your starter weak or even killing it off. Always opt for unbleached flour and filtered or dechlorinated water. It's a simple swap that makes a huge difference, too.
Also, make sure your jar and utensils are clean. Any unwanted bacteria or mold introduced can compete with your starter's good microbes, leading to problems. Cleanliness is a big part of keeping a healthy starter, you know.
FAQs About Feeding Sourdough Starter
People often have questions about how to feed sourdough starter. Here are some common ones that might help you out, too.
How often should I feed my sourdough starter?
The frequency depends on where you keep it. If it's on the counter at room temperature, daily feedings are typically best, sometimes even twice a day if it's very active or new. If it's in the refrigerator, once a week is usually enough. You really just need to watch how quickly it gets hungry, you see.
What kind of flour is best for feeding sourdough starter?
Unbleached all-purpose flour or bread flour works very well for regular feedings. For an extra boost, especially if your starter seems sluggish, a little bit of whole wheat or rye flour can be incredibly helpful. Just avoid bleached flours, as they can be hard on your starter, pretty much.
What should my sourdough starter look like after feeding?
After feeding, your starter should look like a thick pancake batter, without any dry clumps of flour. Over the next few hours, it should start to get bubbly, expand, and eventually double in size before falling back down. It's quite a transformation to watch, honestly.
Keeping Your Sourdough Starter Alive (Without the Stress)
Keeping a sourdough starter alive and thriving doesn't have to be a source of stress, not at all. It's a living thing, yes, but it's also pretty resilient. By following these simple steps on how to feed sourdough starter, you'll find it becomes a natural part of your baking routine. Learn more about sourdough baking on our site, and link to this page for our easy sourdough starter recipe.
The key is to pay attention to your starter's behavior and adjust as needed, rather than sticking to a rigid, unyielding schedule. Includes tips on ratios, hydration, feeding schedules, and common mistakes to avoid, which really helps. With a little practice, you'll be a pro at keeping your starter happy, and you'll be baking amazing bread in no time, you know.
Remember, a well-fed starter is a happy starter, and a happy starter makes wonderful bread. So, keep those microbes fed, and enjoy the journey of sourdough baking. You've got this, pretty much!
- Khamzat Without Beard
- Hobby Lobby Wood Arch Backdrop
- Nomi And Mac Miller
- Watch Your Back 2 Tubi Release Date
- Can Pregnant Woman Drink Bloom

EASY SOURDOUGH STARTER FEED SCHEDULE FOR BEGINNERS - Sourdough and Sangria

How to Feed a Sourdough Starter - How Did You Cook That
How to Feed Sourdough Starter - NatashasKitchen.com
